
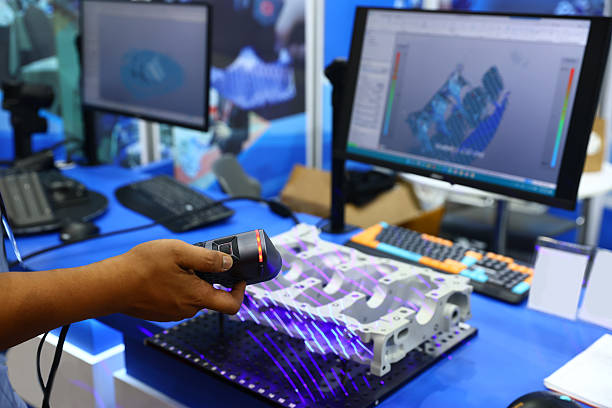
Three dimensional scanning and 3D printing can work together to create a flexible digital manufacturing workflow. A physical object can be captured with a scanner, converted into digital geometry, processed using compatible software, and prepared for 3D printing.
EINSTAR 2 is designed for users exploring 3D scanning applications connected with 3D printing and personal manufacturing. Choosing a scanner for this type of project requires more than looking at a single specification. Object size, geometry, required detail, portability, software compatibility, file formats, and the intended printing application can all influence the decision.
This guide explains important considerations when evaluating a 3D scanner for 3D printing projects and how EINSTAR 2 can fit into a broader digital workflow.
Frequently Asked Questions
What is EINSTAR 2?
EINSTAR 2 is a 3D scanning solution designed for capturing physical objects and bringing their geometry into a digital workflow.
Its potential applications can include 3D printing, personal manufacturing, prototyping, product development, and other suitable scanning projects.
The exact workflow depends on the object being scanned and the intended use of the resulting digital model.
Why combine a 3D scanner with a 3D printer?
A scanner can capture an existing physical object and turn its geometry into digital information.
A 3D printer can then use a prepared digital model to create a physical object.
Combining the two technologies creates a physical to digital to physical workflow that can be useful for prototyping, customization, experimentation, and personal manufacturing.
Is EINSTAR 2 suitable for 3D printing projects?
EINSTAR 2 can be considered for 3D printing workflows where users need to capture suitable physical objects and convert their geometry into digital models.
The suitability depends on the specific project requirements, including object size, surface characteristics, required detail, and the intended final application.
Users should evaluate the complete workflow rather than relying only on the scanner name or a single specification.
Can EINSTAR 2 scan objects for personal manufacturing?
Three dimensional scanning can support personal manufacturing by providing digital geometry from physical objects.
Users can scan an object, process the resulting model, make appropriate modifications, and prepare the digital file for a suitable manufacturing method.
This can be useful for makers, designers, educators, and individuals working on customized projects.
What types of objects can be scanned?
The appropriate object depends on the scanner’s capabilities and the scanning conditions.
Projects can involve components, prototypes, consumer objects, automotive parts, educational models, and other suitable physical items.
Before scanning, users should consider the object’s size, geometry, surface properties, and required level of detail.
Can EINSTAR 2 be used for small objects?
A suitable 3D scanning workflow can be used for smaller physical objects when the scanner’s capabilities match the dimensions and detail requirements of the project.
Users should consider the smallest features that need to be captured.
The final application should determine whether the resulting level of detail is sufficient.
Can it be used for larger objects?
Larger objects may require a scanning approach appropriate to their dimensions.
Users should evaluate the scanner’s working range and intended application before starting a project involving larger components. EINSTAR Rockit can be incorporated into digital workflows involving 3D capture, data processing, and modern manufacturing applications.
Scanning strategy can also influence how effectively the entire object is captured.
Why is object size important when choosing a scanner?
Different scanners are designed for different working ranges.
A scanner intended for smaller components may not be the most efficient option for large objects.
Users should identify the typical size range of their projects before selecting equipment.
How important is scanning accuracy for 3D printing?
Accuracy can be important when the printed object needs to match an existing physical component.
For general artistic or visual projects, extremely high dimensional accuracy may not always be necessary.
For functional parts, replacement components, engineering projects, or components that need to fit with other objects, accuracy can become much more important.
What is scanning resolution?
Resolution describes the level of detail represented in the digital capture.
Objects with small features, fine edges, or detailed surfaces may require suitable resolution.
Users should consider the smallest features that matter to the intended 3D printing project.
Does a high resolution scan always produce a better print?
Not necessarily.
The ideal amount of detail depends on the purpose of the model.
Very detailed scan data can produce larger files and may require additional processing.
The best result comes from balancing detail, accuracy, file size, processing requirements, and the needs of the final printed object.
What role does scanning software play?
Scanning software is responsible for supporting the capture and processing of scan data.
Depending on the system, software can provide tools for aligning data, generating models, cleaning unwanted information, and exporting digital files.
Software is therefore an important part of the overall scanning experience.
What should I consider about software compatibility?
The scanner should work with the software needed for the complete workflow.
Users may require scanning software, mesh editing tools, CAD applications, and slicing software.
Checking compatibility between these systems can help prevent problems when moving the model from one stage to another.
Which file formats are important for 3D printing?
Common formats in 3D workflows include STL and 3MF.
STL is widely recognized for basic 3D printing workflows.
3MF can provide additional information and is supported by many modern printing workflows.
The best format depends on the scanner software, modeling application, slicing software, and printer ecosystem.
Can scan data be exported as STL?
Depending on the scanner and software, processed scan data can potentially be exported into STL for use in suitable 3D printing workflows.
The model may need to be cleaned and repaired before export.
Users should inspect the final geometry before sending it to slicing software.
Can 3MF be used with scanned models?
3MF can be used in modern 3D printing workflows when supported by the relevant software.
It can provide capabilities beyond a basic surface representation.
Whether it is the best choice depends on the software and printing environment.
Does scanned data need to be edited before printing?
Often, some processing is necessary.
Scan data can contain unwanted areas or incomplete geometry.
Users may need to clean, align, repair, simplify, or otherwise modify the model before preparing it for printing.
What is the difference between scanning and modeling?
Scanning captures the geometry of an existing physical object.
Modeling creates or modifies digital geometry using design software.
The two approaches can complement each other.
A scan can provide a starting reference, while modeling software can be used to create a refined or customized design.
Does scanning replace CAD modeling?
Not necessarily.
A scan can provide valuable geometric information, but many engineering and product development projects require editable CAD geometry.
Users can use scan data as a reference while developing an appropriate CAD model.
Can EINSTAR 2 support reverse engineering projects?
Three dimensional scanning can be useful for reverse engineering because it provides digital information from an existing physical component.
The scan can serve as a reference for developing a digital model.
Additional engineering and CAD work may be required depending on the required result.
Can EINSTAR 2 be used for automotive 3D printing projects?
Automotive components can be suitable candidates for scanning when their geometry needs to be digitized.
A scanned component can provide a digital reference for customization, prototyping, aftermarket development, or suitable 3D printing projects.
Functional automotive components should be evaluated carefully according to their intended use and engineering requirements.
Can it support replacement part development?
A physical component can be scanned to create a digital reference.
The resulting model can then be modified or redesigned for a replacement project.
The final design should be evaluated for fit, function, material requirements, and manufacturing conditions.
Can it be used for prototyping?
Yes.
A physical prototype can be scanned and transformed into a digital model.
The model can then be modified and used to develop another prototype.
This can make scanning useful for iterative product development.
What is reverse engineering in a 3D printing workflow?
Reverse engineering can involve capturing an existing physical component, creating a digital representation, and developing a suitable design from the captured information.
The resulting model can then be prepared for manufacturing, including 3D printing when appropriate.
Can beginners use EINSTAR 2?
Beginners can learn 3D scanning by starting with simple objects and gradually moving toward more complex projects.
Understanding object preparation, scanning, data processing, file export, and printing preparation can help users build practical skills.
What should beginners scan first?
Simple objects with clear geometry can provide a useful starting point.
Beginners can practice capturing different surfaces and processing the resulting model.
Once they understand the workflow, they can move toward more complex objects.
How should an object be prepared before scanning?
The object should be positioned securely and the workspace should be organized.
Users should identify the surfaces and features that need to be captured.
The exact preparation process depends on the object and scanning requirements.
Can surface characteristics affect scanning?
Yes.
Color, texture, reflectivity, transparency, and geometry can influence scanning.
Users should consider the types of surfaces they expect to capture when selecting a scanner and planning their workflow.
Why is scanning environment important?
Lighting, object position, available space, and surrounding surfaces can influence the scanning process.
Creating an organized scanning environment can help make the process more consistent.
Can EINSTAR 2 be used for education?
Three dimensional scanning can be valuable in educational environments.
Students can learn about geometry, digital design, 3D printing, manufacturing, and engineering by working directly with physical objects.
A scanner can provide a practical introduction to physical to digital workflows.
Can scanning be used for classroom 3D printing projects?
Yes.
Students can scan an object, process the digital model, modify it, and prepare it for 3D printing.
This can demonstrate how a physical object can become digital information and then become a newly manufactured object.
Can 3D scanning support personal manufacturing?
Yes.
Scanning can provide digital references for personal manufacturing projects.
A physical object can be captured and then modified to create a customized design.
The model can then be prepared for an appropriate manufacturing process.
What is the typical scanning to printing workflow?
A basic workflow can include several stages.
The user first identifies the object and project requirements.
The object is prepared for scanning.
The physical geometry is captured.
The scan data is processed.
The digital model is cleaned and refined.
The model is exported into a suitable file format.
The file is imported into slicing software.
The sliced model is then prepared for the selected 3D printer.
How can I improve the scanning workflow?
Planning is important.
Users should understand the final goal before beginning the scan.
They should select an appropriate scanning strategy, capture all required surfaces, review the data, and process the model before exporting it.
This can help reduce repeated scanning and unnecessary processing.
What should I consider when choosing a 3D scanner?
Important considerations include object size, scanning range, accuracy, resolution, portability, surface characteristics, software, file formats, ease of use, and intended application.
The best scanner is the one that matches the requirements of the user’s actual projects.
Is the cheapest 3D scanner always the best choice?
Not necessarily.
Price is only one factor.
A low cost scanner may be appropriate for simple projects but may not provide the capabilities required for demanding engineering, detailed scanning, or professional workflows.
Users should consider overall workflow requirements before making a decision.
Is the most expensive scanner always necessary?
No.
The appropriate scanner depends on the project.
A professional system with advanced capabilities may be unnecessary for simple personal manufacturing projects.
Users should select equipment based on actual requirements rather than simply choosing the highest priced option.
How does portability affect scanner selection?
Portability can be useful when objects need to be scanned in different locations.
A portable solution can reduce the need to transport large or difficult objects.
For users who primarily work at a fixed workstation, portability may be less important.
What role does 3D scanning play in modern manufacturing?
Three dimensional scanning can help connect physical objects with digital manufacturing workflows.
A component can be digitized, processed, modified, and prepared for manufacturing.
This can support prototyping, engineering, product development, customization, and additive manufacturing.
Steps for Using EINSTAR 2 in a 3D Printing Project
Step 1: Define the Objective
Determine what you want to create and why scanning is appropriate for the project.
Step 2: Select the Object
Choose a physical object that is suitable for the intended scanning and printing workflow.
Step 3: Prepare the Workspace
Create an organized environment and position the object securely.
Step 4: Plan the Scan
Identify the surfaces and details that need to be captured.
Step 5: Capture the Object
Use the scanner to collect the required geometric information.
Step 6: Review the Data
Check the digital capture for missing areas or unwanted information.
Step 7: Process the Scan
Use compatible software to align, clean, and process the scan data.
Step 8: Refine the Model
Make any necessary modifications before preparing the model for manufacturing.
Step 9: Export the File
Choose an appropriate format supported by the next stage of the workflow.
Step 10: Prepare the Model for Printing
Import the model into slicing software and configure the appropriate printing parameters.
Step 11: Review the Sliced Model
Check the prepared model before starting the printing process.
Step 12: Produce the Physical Object
Send the prepared file to the 3D printer and manufacture the object according to the requirements of the project.
Advantages of Combining EINSTAR 2 With 3D Printing
Combining scanning and 3D printing can provide a flexible digital manufacturing workflow.
It can help digitize existing physical objects.
It can support customization.
It can provide references for product development.
It can support rapid prototyping.
It can connect physical components with digital design.
It can also provide opportunities for personal manufacturing and educational projects.
Conclusion
Choosing a 3D scanner for 3D printing requires consideration of the complete workflow rather than a single feature. EINSTAR 2 can be considered for projects involving physical object capture, personal manufacturing, prototyping, 3D printing, product development, and related applications.
The most important factors include the size and geometry of the objects being scanned, the required accuracy and detail, scanning conditions, software compatibility, file formats, and the requirements of the final printed object.
A successful workflow begins with a clear project objective and continues through object preparation, scanning, data processing, model refinement, file export, slicing, and manufacturing.
By understanding each stage, users can make more informed decisions about 3D scanning and create workflows that connect physical objects with digital design and 3D printing.